Category Archives: Horse Facility

The Importance of Being Compost

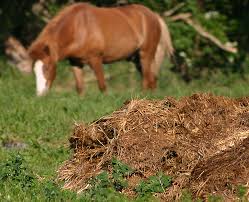
This is part of a series of posts about manure management on a small horse property (the property is small, not the horse…)

I’m going to interrupt my series on selecting a manure management system to delve into some of the reasons compost is so important, and add some reasons you may want to consider compost production as the manure management method you select.

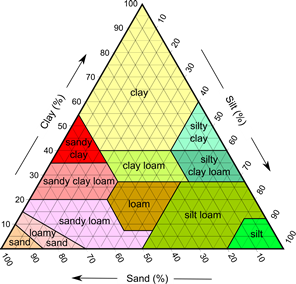
Let’s start with a little lesson on soils. For a while, I considered becoming a landscape designer, and as part of the program I took a soils class. I learned that soil (it is NEVER called “dirt”, which is what gets under your fingernails) has both texture and structure. Texture refers to the relative volumes of sand, silt and clay in the soil. These are inorganic materials and have different characteristics.

Sand is the largest particle and is generally round or angular. It has large air spaces that improve aeration, but does not hold water or nutrients well.

Silt is a mid-sized particle. It feels like flour when dry and velvety when wet. It holds water and nutrients well. Like sand, its shape is round or angular

Clay is the smallest size particle. Clay particles tend to be flat. They stick together and do not provide good aeration. It does hold water and nutrients well. Clay forms hard clumps when dry and is sticky when wet.

The percentage of each of these 3 particles in the soil determine the soil texture. There is a Textural Triangle that tells you what type of soil you have based on these percentages. This is based only on the content of sand, silt and clay and ignores any other components of a soil. Here’s the USDA Textural Triangle:

The soil tends to be very sandy where I live. When I was buying the property, a new well needed to be drilled. When you drill a well, you end up with quite a lot of soil, called “tailings”, that is removed during the drilling process. Those tailings need to go somewhere, and in my case they got dumped in what is now part of my garden. That included an impressive amount of clay that was from a layer below the typical sandy soil.

I thought, no problem, we have a lot of sand, the clay will just balance it out, right? WRONG! It doesn’t work that way. Meanwhile, I have a slimy mess in that part of the garden.

A few years later, I found myself in the soils class, and asked the instructor why mixing the sand and the clay didn’t result in some beautiful improved soil mix. That’s where soil structure entered the picture. Soil structure is the way sand, silt and clay form aggregates through a variety of processes and result in a variety of shapes. In my case, I basically got sandstone.

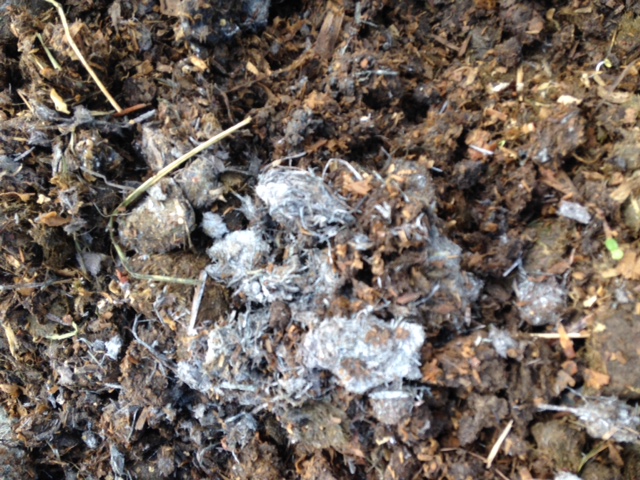
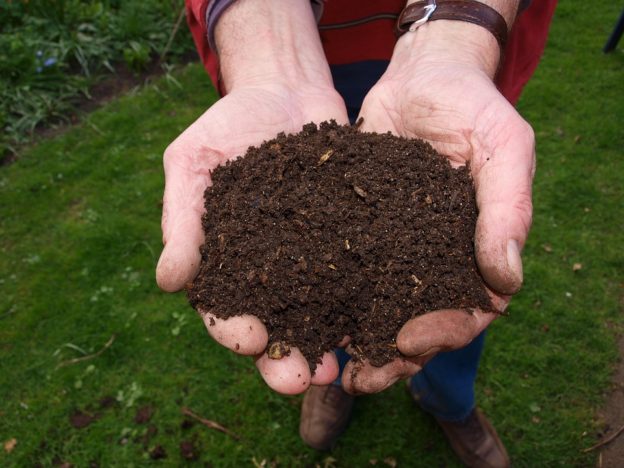
Soil consists of more than sand, silt and clay. Those just determine what soil type you have. In addition, you have water, air spaces and organic matter. When I asked my instructor how to improve my soil, the answer was—add organic matter. Adding organic matter will improve almost any soil. It improves aeration and the ability to hold nutrients, and generally makes it more workable. Guess what compost is? Yep-organic matter. And if you have horses on your property and are dealing with the poop that goes along with that, you have the raw ingredients to magically improve your soil.

Organic matter eventually breaks down and is consumed, unlike the inorganic components of sand, silt and clay, so it needs to be continually replenished. And your horses are happy to oblige. So with a good system of composting horse manure, you can keep your soil happy, healthy, and usable now and in the future.

It is now Spring after a year of heavy rain. I’m finally able to get out in the yard and tackle the weeds. And of course, I started in what is still a clay mud pit. Each weed I pulled came up with a sucking sound and a couple pounds of mud. The area was a sulky blue-gray color and slippery. I trundled off with a wheelbarrow to the one fully composted pile in the pasture and started incorporating organic material into the sticky clay. It’s going to need a lot more, and fortunately more is in the works.  But my motivation to install a better composting system that will result in faster production of higher-quality compost has gotten a new boost.

Manure Management for the Back-Yard Horse Owner, Part 2

Poop happens. Pick it up.

This is Part 2 of a series on Manure Management for back-yard horse owners. In Part 1 https://inbalanceequestrian.com/manure-management-for-the-back-yard-horse-owner/, I covered the challenges of managing the manure produced by horses on a small facility. Here’s a brief recap and list of fun facts about horse manure:

  • The average horse produces 45 pounds of manure each day
  • To store a year’s worth of manure for 1 horse, you would need an are 12 x 12 feet piled 3-5 feet deep (not including any bedding incorporated into the pile)
  • Problems caused by an accumulation of manure include
    • Odor
    • Flies
    • Parasites
    • Waterway pollution from runoff
    • Takes up space
    • Eyesore
  • Considerations when evaluating your options
    • Cost
    • Time
    • Space
  • Options for disposal
    • Have it hauled off
      • Garbage company (expensive)
      • Compost company
      • Local farms or vineyards
    • Spread it on pasture
      • Flies and parasites still a problem
      • Pollution can still be a problem
      • Spotty nutritional composition
      • Requires labor or special equipment
    • Compost it
      • Requires space
      • Must be located to prevent pollution from runoff
      • Requires active management
      • Requires labor for most effective methods
      • Done correctly, kills flies, pathogens and weed seeds
      • Results in a useful and desirable product for farm and garden
  • Composting is often the most desirable method.
    • Doesn’t require transporting the manure
    • Done properly (with heat), kills most pathogens, fly eggs, parasites
    • Results in highly desirable garden or farm product
  •  Facts about composting:
    • Requires 4 things
      • Nitrogen
      • Carbon
      • Oxygen Moisture
    • The ideal carbon:nitrogen ratio is 25:1 or lower
    • Horse manure on its own (sans bedding) is close to that ideal ratio
    • Bedding adds carbon and that tends to make the ratio too heavy on carbon for successful composting. Depending on how much bedding is included in the pile, the ratio can be as high as 75:1 as bedding is almost entirely carbon (C/N ratio 500:1)
    • The heat generated by most methods destroys the flies, parasites and weed seeds
    • Usually there are 3 piles going, in various stages of completion

I’m opting for composting. Actually, I’ve technically been composting by piling it all up in my pasture, which is a form of composting, but not the most effective method.

My great big manure pile

There are several ways to create compost The three most common are:

  • Anaerobic composting (the method I’ve been using).
    • Piling the manure, no active management
    • Least labor-intensive
    • Produces the lowest-quality compost.
    • Manure will, eventually, decompose but:
      •  it takes a lot longer,
      •  it tends to have an unpleasant odor,
      • attracts flies
      • does not kill pathogens, fly eggs, parasites, or weed seeds.
  • Vermicomposting.
    • Adding earthworms to the manure pile (or if you’re lucky, they may just show up on their own).
    • Requires a minimal amount of equipment,
    • Composts faster than the anaerobic method
    • Produces great-quality compost.
    • Needs to be kept aerobic and a proper moisture level maintained.
    • Pathogen reduction may not be as great as in the next method.
  • Aerobic thermophilic.
    • Most highly recommended method
    • Requires more active management than the other methods
    • Results in nice compost
    • The pathogens, fly eggs, parasites, and weed seeds are largely destroyed.
    • The pile is maintained in a way that provides optimal conditions for microbes
      •  that break down organic matter, and
      • generate temperatures up to 160-165 degrees F during the process.
    • Heat is what destroys the undesirable elements.
    • Requires the right mix of carbon, nitrogen, oxygen and moisture.
    • To achieve the right temperature, the pile should be at least 3 feet square.

To keep the right oxygen level, the pile must be kept aerated if using the second and third method (the first method is anaerobic (without oxygen), which is why it is the least effective method.  There are a few methods for aerating the pile.

  • Turning manually using a pitchfork (labor intensive. Trust me)
  • Turning mechanically, using a tractor or front loader
  • Using a blower system, either purchased or homemade (aka Aerated Static Compost system)

The system should be covered to prevent drying out in dry weather and getting soggy and anaerobic in wet weather. Covers can be either tarps or a roof.

Also, while I keep saying “Pile” of manure, there is also the option of building bins to contain the manure. This can keep the composting manure tidier and makes it easier to manage.

I’ve been reviving my anaerobic pile by turning it with a pitchfork (since it’s too muddy out there to bring out the tractor) and adding fresh manure. It’s been a lot of work, but that pile is now hot and “cooking”. By the way, a compost pile it is hot will take on a white coating that looks like charcoal briquettes that are ready for the food to go on the grill.  But, while I appreciate the upper body workout, the allure of the blower system is calling to me.

“Cooking” compost

Blower systems come in many forms and consist of ventilated pipes that run through the pile or bin  and are connected to a blower that forces oxygen into the pile. It eliminates the need to turn the pile and, since it is usually connected to a timer that turns the blower on and off at regular intervals, it produces a consistent product.

The lead maker of static aerated systems for small acreage operations is O2 Compost (www.o2compost.com). They have a wide variety of systems, ranging from simple self-assembly boxes to larger, more permanent and more attractive solutions. According to their website, the simplest single- box system starts at $675. They will design a system for you and install it if you like so pricing depends on what you select. They also provide training programs. I saw one of these systems at a local facility and it is on my wish list! But it might not be in my budget since I want something a bit larger and grander than the single-box system.

Plans for build-it-yourself systems are available online, both downloadable PDFs and YouTube videos. Materials vary from systems build from pallets to concrete block bins with a roof.

I’ll be evaluating my composting options and will post my progress as this project continues to take shape.

Manure Management for the Back-Yard Horse Owner

I love having my horses in my back yard. Going out early (very early) every morning to greet and feed them, being able to pop out to the barn for a visit or a ride, being able to monitor their health and well-being on a daily or even hourly basis—it’s all good.

Of course, it doesn’t take much time as a back yard horse owner to figure out that, yeah, poop happens. A lot. The average horse produces about 45 pounds of poop a day, and that adds up fast. If you were to store it, you would need an area 12 x 12 feet, piled 3-5 feet deep, to store a year’s worth if it includes bedding. That’s around 16 cubic yards, and it could be more depending on the horse and how much bedding is used. Multiply that by the number of horses you maintain on your property, and it becomes clear that it’s a lot better to dispose of it than it is to store it.

I have to admit, I’ve been pretty slack about managing the manure supply. I’ve been piling it in a section of the pasture not subject to runoff and crossing my fingers that it will self-compost. Then, a couple times a year, after discovering that it will NOT self-compost, I use the tractor to spread it over another section of the pasture. This, by the way, is not ideal. It makes for an ugly pile, taking up pasture space, and since the horses have free access to it, I avoid adding compost-able items like grass clippings and vegetable waste from the house.

Aside from the aesthetics, horse manure plays host to flies and parasites. In addition, if not stored in an appropriate location, it can pollute local waterways. Local zoning requirements dictate how far away from a waterway manure can be stored, and obviously it should be in a place apart from where water flows through the property during heavy rainfall.

The main options for disposal are:

  • Have it hauled off
  • Spread it on a pasture area
  • Compost it.

There are people who will haul it off. The garbage company, for one. You will need a dumpster and pay to have it emptied. Other options are farmers and vineyards. Many large stables use this option, and it may be an option for the small-parcel horse owner as well. Try contacting local farmers (vegetable or flower farms) or vineyards and see if they are interested, and then work out the logistics (Who hauls it? Who loads it? How often?). Local compost companies may be another option, although the main compost facility in our area doesn’t accept it.

Spreading (aka “land application”) is another option. Spreading an inch or so  over pasture areas can improve the soil quality. As in storing, care should be taken that it does not run off into water sources. It can be spread as it is cleaned from the barn and paddocks, or accumulated and then use a tractor bucket or a manure spreader to spread it later. Nutrient composition can be spotty, and flies and parasites are still a problem.

My favorite, but harder to implement, solution is composting. This is a science unto itself, and I’m going to present a cursory explanation right now. This is the option I’ve selected, and that means I have a lot more research to do. But here are the bare-bones basics:

  • Successful composting requires 4 things:
    • Nitrogen
    • Carbon
    • Oxygen
    • Moisture
  • The ideal carbon:nitrogen ratio is 25:1 or lower
  • Horse manure on its own (sans bedding) is close to that ideal ratio
  • Bedding adds carbon and that tends to make the ratio too heavy on carbon for successful composting. Depending on how much bedding is included in the pile, the ratio can be as high as 75:1 as bedding is almost entirely carbon (C/N ratio 500:1)
  • Oxygen can be added in a couple ways
    • Frequent turning of the pile
    • Static air flow (system of perforated pipes and a blower)

With all those factors present, manure can “hot compost” which will lead to destruction of parasites and their eggs and weed seeds, leaving you with a very desirable garden compost. The desired internal temperature of the compost pile is 131 to 150 degrees F.

Composting can be done with free piles on the ground, or in bins. Either way, there are usually 3 piles or bins, with manure in various stages of completed composting in each pile or bin. Once the compost is finished (broken down), the finished compost can be put on the garden or given away.

There is a lot more information on composting coming up, including descriptions of systems that can either be constructed or purchased, depending on your budget.

Mat Management

Rubber stall mats make a great surface for stall floors. They’re cushy for your horse and easy to clean. And even our local gophers, which don’t seem to be stopped by anything, haven’t been able to chew through them.

There are some issues with them, though. The first one you’ll likely encounter is that they are hard to move. The standard size is 4’x6′ and they are 3/4″ thick solid rubber and weigh in at around 100 lbs. They are not only heavy but awkward and hard to hold on to.

I discovered a great tool called a Mat Grabber. There are a few companies that make these and they all seem to be plastic. They have a toothed upper and lower surface. Slide them on the mat and when you pull back, they grab the mat. They have handles so you can just pull back on the mat to move it, and there is a handy release button. Many ranch supply stores stock them, or you can order them online (I got mine through Amazon).

A few tips on using these things. Pull STRAIGHT back to lock them in place. Also, clean up the mats as much as possible as dirt and moisture will cause them to slip. Keep the grabber surfaces clean as they will slip if dirt or mud build up between the teeth. You can use a screwdriver to clean them out between the teeth. These things take a little getting used to but when you get the hang of them, they are worth their weight in gold!

The next issue is that the mat may not fit exactly in your stall. They are sized so that six of them will surface a 12×12 surface, but if your structure has footings, as my new barn does, and you want the mats to fit inside the footings, you may need to trim them. NOTE–trimming is a good idea, as if the mat sides slide up over the footings, you can trap moisture and worse in between the wall and the mat–not good for the wall surface.

I had hoped that there was a slick power tool for this but it seems not. The toothed surfaces of circular saw blades apparently make a mess and generate a lot of heat when used on rubber. I read about a special jigsaw blade for the purpose but was not able to actually locate one. The generally accepted practice is to use a heavy-duty utility knife (a fixed blade as opposed to retractable is recommended). Measure carefully (you don’t want make these cuts more than once) and mark the line. I snapped a chalk line. Lay the mat over a board with the cutting line resting on the edge of the board. This way, the trimmed portion will fall away as you cut it, making it easy to see the cutting line and reducing friction on the blade.

Using a straight edge (such as a board) get a good first cut so you can easily see the cut mark and then try the best tip I found online. Spray the cut with WD40. This will really make the cutting process much easier. With that tip, and keeping a sharp blade in the cutter, It took me about 3 or 4 passes with the knife to get through the mat. Not bad for a thick piece of heavy rubber. The WD40 will pretty much erase your chalk line, so be sure to get a good first cut and use the board so you can see where you made the cut. Otherwise you are likely to get a lot of random cut marks, making for a sloppy cut line and a lot of extra work!


Fencing Tip

I am tearing down old fencing to make way for the new barn and new, reconfigured paddocks. So this is a good time to share some fencing education that I learned a bit late and for which I am now paying the price. My fencing is typical 5-foot horse fencing. When I put it up several years ago, I chose to put the staples into the fenceposts directly over the spot where the horizontal and vertical wires met and were wired together. Seemed stronger that way.

Then I took the Facilities Management class at Santa Rosa Junior College and learned that the correct way to staple the fencing is to put the staples over the horizontal wires. That way, if a horse hits the fence, there is some “give” that can save both the horse and the fence from damage.

And now that I am “undoing” my incorrect installation, I can share another reason for not putting the staples in over the junction of horizontal and vertical wires. IT IS A PAIN TO REMOVE THOSE STAPLES WHEN APPLIED IN THIS MANNER! I’m using my trusty fencing tool to remove the staples, and trying to pry the end under that mish-mosh of joined wires to pry the staple loose is time-consuming and difficult.

So staple the fencing correctly, and save your horse, your fence and yourself some damage and aggravation!

By the way, I bought my fencing tool in the 1970s when I was riding in the Working Cowgirl class in local parades, and it was a required piece of equipment. That’s the only reason I bought it. Forty years later, it is one of my most valuable pieces of equipment! Also known as fencing pliers. I’d hoped to include a picture but I don’t seem to be able to find one that is not copyrighted and I’m too lazy to go out and take a picture of my own.