Monthly Archives: March 2019

Manure Management for the Back-Yard Horse Owner, Part 2

Poop happens. Pick it up.

This is Part 2 of a series on Manure Management for back-yard horse owners. In Part 1 https://inbalanceequestrian.com/manure-management-for-the-back-yard-horse-owner/, I covered the challenges of managing the manure produced by horses on a small facility. Here’s a brief recap and list of fun facts about horse manure:

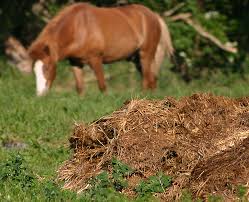
  • The average horse produces 45 pounds of manure each day
  • To store a year’s worth of manure for 1 horse, you would need an are 12 x 12 feet piled 3-5 feet deep (not including any bedding incorporated into the pile)
  • Problems caused by an accumulation of manure include
    • Odor
    • Flies
    • Parasites
    • Waterway pollution from runoff
    • Takes up space
    • Eyesore
  • Considerations when evaluating your options
    • Cost
    • Time
    • Space
  • Options for disposal
    • Have it hauled off
      • Garbage company (expensive)
      • Compost company
      • Local farms or vineyards
    • Spread it on pasture
      • Flies and parasites still a problem
      • Pollution can still be a problem
      • Spotty nutritional composition
      • Requires labor or special equipment
    • Compost it
      • Requires space
      • Must be located to prevent pollution from runoff
      • Requires active management
      • Requires labor for most effective methods
      • Done correctly, kills flies, pathogens and weed seeds
      • Results in a useful and desirable product for farm and garden
  • Composting is often the most desirable method.
    • Doesn’t require transporting the manure
    • Done properly (with heat), kills most pathogens, fly eggs, parasites
    • Results in highly desirable garden or farm product
  •  Facts about composting:
    • Requires 4 things
      • Nitrogen
      • Carbon
      • Oxygen Moisture
    • The ideal carbon:nitrogen ratio is 25:1 or lower
    • Horse manure on its own (sans bedding) is close to that ideal ratio
    • Bedding adds carbon and that tends to make the ratio too heavy on carbon for successful composting. Depending on how much bedding is included in the pile, the ratio can be as high as 75:1 as bedding is almost entirely carbon (C/N ratio 500:1)
    • The heat generated by most methods destroys the flies, parasites and weed seeds
    • Usually there are 3 piles going, in various stages of completion

I’m opting for composting. Actually, I’ve technically been composting by piling it all up in my pasture, which is a form of composting, but not the most effective method.

My great big manure pile

There are several ways to create compost The three most common are:

  • Anaerobic composting (the method I’ve been using).
    • Piling the manure, no active management
    • Least labor-intensive
    • Produces the lowest-quality compost.
    • Manure will, eventually, decompose but:
      •  it takes a lot longer,
      •  it tends to have an unpleasant odor,
      • attracts flies
      • does not kill pathogens, fly eggs, parasites, or weed seeds.
  • Vermicomposting.
    • Adding earthworms to the manure pile (or if you’re lucky, they may just show up on their own).
    • Requires a minimal amount of equipment,
    • Composts faster than the anaerobic method
    • Produces great-quality compost.
    • Needs to be kept aerobic and a proper moisture level maintained.
    • Pathogen reduction may not be as great as in the next method.
  • Aerobic thermophilic.
    • Most highly recommended method
    • Requires more active management than the other methods
    • Results in nice compost
    • The pathogens, fly eggs, parasites, and weed seeds are largely destroyed.
    • The pile is maintained in a way that provides optimal conditions for microbes
      •  that break down organic matter, and
      • generate temperatures up to 160-165 degrees F during the process.
    • Heat is what destroys the undesirable elements.
    • Requires the right mix of carbon, nitrogen, oxygen and moisture.
    • To achieve the right temperature, the pile should be at least 3 feet square.

To keep the right oxygen level, the pile must be kept aerated if using the second and third method (the first method is anaerobic (without oxygen), which is why it is the least effective method.  There are a few methods for aerating the pile.

  • Turning manually using a pitchfork (labor intensive. Trust me)
  • Turning mechanically, using a tractor or front loader
  • Using a blower system, either purchased or homemade (aka Aerated Static Compost system)

The system should be covered to prevent drying out in dry weather and getting soggy and anaerobic in wet weather. Covers can be either tarps or a roof.

Also, while I keep saying “Pile” of manure, there is also the option of building bins to contain the manure. This can keep the composting manure tidier and makes it easier to manage.

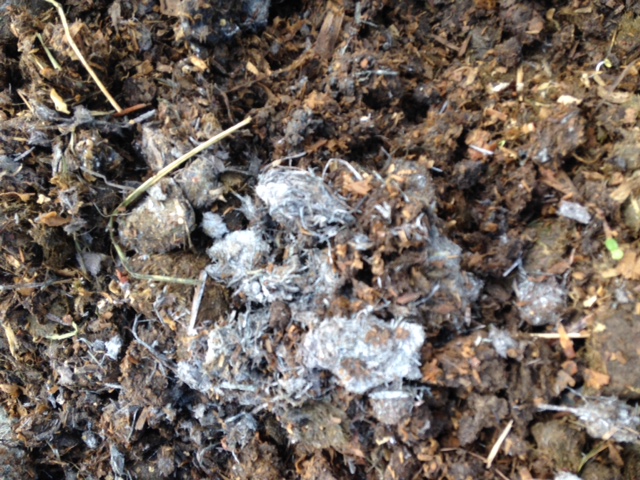
I’ve been reviving my anaerobic pile by turning it with a pitchfork (since it’s too muddy out there to bring out the tractor) and adding fresh manure. It’s been a lot of work, but that pile is now hot and “cooking”. By the way, a compost pile it is hot will take on a white coating that looks like charcoal briquettes that are ready for the food to go on the grill.  But, while I appreciate the upper body workout, the allure of the blower system is calling to me.

“Cooking” compost

Blower systems come in many forms and consist of ventilated pipes that run through the pile or bin  and are connected to a blower that forces oxygen into the pile. It eliminates the need to turn the pile and, since it is usually connected to a timer that turns the blower on and off at regular intervals, it produces a consistent product.

The lead maker of static aerated systems for small acreage operations is O2 Compost (www.o2compost.com). They have a wide variety of systems, ranging from simple self-assembly boxes to larger, more permanent and more attractive solutions. According to their website, the simplest single- box system starts at $675. They will design a system for you and install it if you like so pricing depends on what you select. They also provide training programs. I saw one of these systems at a local facility and it is on my wish list! But it might not be in my budget since I want something a bit larger and grander than the single-box system.

Plans for build-it-yourself systems are available online, both downloadable PDFs and YouTube videos. Materials vary from systems build from pallets to concrete block bins with a roof.

I’ll be evaluating my composting options and will post my progress as this project continues to take shape.

Manure Management for the Back-Yard Horse Owner

I love having my horses in my back yard. Going out early (very early) every morning to greet and feed them, being able to pop out to the barn for a visit or a ride, being able to monitor their health and well-being on a daily or even hourly basis—it’s all good.

Of course, it doesn’t take much time as a back yard horse owner to figure out that, yeah, poop happens. A lot. The average horse produces about 45 pounds of poop a day, and that adds up fast. If you were to store it, you would need an area 12 x 12 feet, piled 3-5 feet deep, to store a year’s worth if it includes bedding. That’s around 16 cubic yards, and it could be more depending on the horse and how much bedding is used. Multiply that by the number of horses you maintain on your property, and it becomes clear that it’s a lot better to dispose of it than it is to store it.

I have to admit, I’ve been pretty slack about managing the manure supply. I’ve been piling it in a section of the pasture not subject to runoff and crossing my fingers that it will self-compost. Then, a couple times a year, after discovering that it will NOT self-compost, I use the tractor to spread it over another section of the pasture. This, by the way, is not ideal. It makes for an ugly pile, taking up pasture space, and since the horses have free access to it, I avoid adding compost-able items like grass clippings and vegetable waste from the house.

Aside from the aesthetics, horse manure plays host to flies and parasites. In addition, if not stored in an appropriate location, it can pollute local waterways. Local zoning requirements dictate how far away from a waterway manure can be stored, and obviously it should be in a place apart from where water flows through the property during heavy rainfall.

The main options for disposal are:

  • Have it hauled off
  • Spread it on a pasture area
  • Compost it.

There are people who will haul it off. The garbage company, for one. You will need a dumpster and pay to have it emptied. Other options are farmers and vineyards. Many large stables use this option, and it may be an option for the small-parcel horse owner as well. Try contacting local farmers (vegetable or flower farms) or vineyards and see if they are interested, and then work out the logistics (Who hauls it? Who loads it? How often?). Local compost companies may be another option, although the main compost facility in our area doesn’t accept it.

Spreading (aka “land application”) is another option. Spreading an inch or so  over pasture areas can improve the soil quality. As in storing, care should be taken that it does not run off into water sources. It can be spread as it is cleaned from the barn and paddocks, or accumulated and then use a tractor bucket or a manure spreader to spread it later. Nutrient composition can be spotty, and flies and parasites are still a problem.

My favorite, but harder to implement, solution is composting. This is a science unto itself, and I’m going to present a cursory explanation right now. This is the option I’ve selected, and that means I have a lot more research to do. But here are the bare-bones basics:

  • Successful composting requires 4 things:
    • Nitrogen
    • Carbon
    • Oxygen
    • Moisture
  • The ideal carbon:nitrogen ratio is 25:1 or lower
  • Horse manure on its own (sans bedding) is close to that ideal ratio
  • Bedding adds carbon and that tends to make the ratio too heavy on carbon for successful composting. Depending on how much bedding is included in the pile, the ratio can be as high as 75:1 as bedding is almost entirely carbon (C/N ratio 500:1)
  • Oxygen can be added in a couple ways
    • Frequent turning of the pile
    • Static air flow (system of perforated pipes and a blower)

With all those factors present, manure can “hot compost” which will lead to destruction of parasites and their eggs and weed seeds, leaving you with a very desirable garden compost. The desired internal temperature of the compost pile is 131 to 150 degrees F.

Composting can be done with free piles on the ground, or in bins. Either way, there are usually 3 piles or bins, with manure in various stages of completed composting in each pile or bin. Once the compost is finished (broken down), the finished compost can be put on the garden or given away.

There is a lot more information on composting coming up, including descriptions of systems that can either be constructed or purchased, depending on your budget.

Fire and Rain—Are You and Your Trailer Evacuation-Ready?

The latest grim joke here in Sonoma County is that our new theme song is “Fire and Rain”—“I’ve seen fire and I’ve seen rain”…

After deadly and devastating wildfires in October 2017, and now massive flooding in February 2019, local residents are getting a bit edgy about natural disasters.  The floods have proven far less deadly than the fires. But in both cases, animal owners were faced with getting their animals out—fast. If you own a horse, that means loading up and heading out. But are you ready?

That’s what I asked myself yesterday while watching the news and social media posts crop up. And the answer is—not really. My trailer has been sitting immobile by the barn for probably nearly a year. I haven’t done much riding, and when I do go out, it’s in my riding buddy’s trailer. But if I needed to get my horses out fast, that trailer would need to be ready to go. My buddy’s trailer will be full of her own horses. That’s something to think about if you don’t own a trailer because you know you can borrow one in a pinch. If it’s an evacuation situation, you may not have one available to you.

Thankfully, I didn’t need to evacuate, or help anyone else evacuate, this time. But today I pulled out my trailer checklist and starting doing a maintenance check. Physically going through that checklist surfaced a few “gotchas”. I’m sharing them here as an example of little things that trip you up, and why it’s best to do this check in a non-emergency mode, because often the most routine tasks don’t go quite as you expected.

An obvious first step is to check the tire pressure. I did finally buy a portable air compressor and had checked the tires when I got it a few months ago, but now I couldn’t remember what the PSI should be. It is on the tire sidewall (maximum recommended at cold temps) but the pressure listed on the sidewall is not necessarily the pressure that is correct for the vehicle—my car tires have a much higher PSI listed on the sidewall than the car manufacturer recommends (my old tires didn’t even list PSI—they listed KPa which means Kilopascal, and I had to look up how to convert it—here’s a link https://www.unitconverters.net/pressure/kpa-to-psi.htm).  I had done research months ago about what the PSI for my trailer should be, but did I put that information anywhere useful? Like in the tack compartment? Apparently not. Finally I remembered that my trailer service guy had told me to inflate them to 50 PSI (sidewall says 65). So lesson 1—know what your tire pressure should be and post it somewhere useful. Today I printed it out on a label maker and stuck it to the inside of the tack compartment—it won’t fade and the label is waterproof. Also (and maybe it’s just me that has trouble with this), make sure you know how to use the pressure gauge and the compressor’s air nozzle. I always feel like I’m letting more air out than I’m getting in. AND remember to check the spare. That was the only tire that needed to be inflated during today’s check.  One thing to look for is missing valve stem caps. It’s a good idea to buy a pack and keep them on hand. This is the one item in the automotive world where one size fits all.

While you’re checking the pressure, give the tires a good looking over. Check for uneven wear, shallow tread depth, and sidewall damage, including sun damage. UV rays can really destroy your tires, causing cracking and breakdown of the rubber. It’s recommended that tires be replaced every 7 years even if the tread is good, mostly because of sun damage. I bought tire covers for mine to protect them from sun damage and hopefully get some extra wear from them.

Check the lug nuts for loose or missing lug nuts. Speaking of which—do you have a lug wrench handy?

On to checking the lights. One of the marker light lenses had blown off. It’s one of the original lenses and wouldn’t stay on when I tried to put it back where it belonged. This isn’t the first time this has happened with this trailer, and finally I bought a 10-pack of both red and amber lenses, so I had one handy. The replacements seem to stay put a lot better than the originals. So think about getting some spares to keep on hand. Even if yours stay on, I’ve had horses damage them if they get a bit squirrely while loading or while tied to the trailer.

Some of my marker lights were out. Interestingly enough, I had checked them last summer and more of them were out then than were out today. Self-healing marker lights, apparently. Three of them were still out. I got one to come back on by removing the lens and tapping the light fixture and jiggling the bulb, and it finally came on and stayed on. The other two seem to be non-operational. My plan is to buy replacement bulbs and see if that does the trick and if not, I’ll have them fixed when the trailer goes in for routine maintenance.

Other things that can go wrong with lights are fuses and wiring. Know where your fuses are and what kind they are and keep some spares on hand. If it’s a wiring problem, well, I leave it to the experts. I can tell a blue wire from a red wire and that’s where my expertise ends.

On to the breakaway brake battery. This is your trailer’s “emergency brake”. A cable gets looped over your hitch and if the trailer comes loose from the tow vehicle, the cable pulls a pin on the trailer that activates a battery operated brake. The batteries tend to go dead if the trailer sits a while (most are hooked into the trailer wiring system and the battery will re-charge when the tow vehicle is running). The battery can be tested with a battery tester. Alternatively, try pulling the pin manually and listen for the click as the trailer brakes go on. You can also pull the pin and then (gently) see if the tow vehicle can move the trailer.

The battery for my system appeared (not surprisingly) to be dead. I was feeling pretty smug because I just got a trickle charger for this purpose. On to the next humbling experience: I had never actually looked at the battery. It’s been either charged up or replaced during the routine maintenance checks but I’ve never looked at it myself. I just assumed it was the same type of battery in my last trailer that could be trickle charged using clamps. But the battery for this trailer has slip on cables and neither of the attachments that came with the trickle charger appear to connect to it. So I still need to figure this one out but the batteries don’t seem to be that expensive so I may just replace it. Or drive around with the trailer empty and see if the battery charges up again–obviously not the best plan

Next step: check the trailer floor. I do this periodically and it’s always been fine, so I was a little surprised to see that the boards were wet under the mats, and in fact had some mud wedged between the mats and the trailer wall. The trailer is aluminum so fortunately there was no rust, and the floor boards don’t seem to have any rot in spite of being wet, but the mats are now pulled up and the floor is airing out. Thankfully the rains have stopped for a couple days so with luck those boards will dry out. Incidentally, if your trailer floor is aluminum, it still needs to be checked. If urine accumulates under the mat, the aluminum can corrode.

Also check the rubber mats on the sides of the trailer and make sure they are secure. I had a horse pull one part way down and rip it, and I know of one person who got to her destination to discover that the side mat had come down sometime during the haul. Fortunately, she had a calm horse who seemed more surprised than concerned, but he did have to straddle it during that trip.

My trailer has an additional “feature” (read: curse) in the form of a crank-up skylight in the tack compartment. Sounds nice, but in fact the plastic cover is definitely not UV resistant and doesn’t seem to last very long. I got it replaced 4 years ago but when I checked it today, sure enough, it has cracks in it, and I have water on my tack compartment floor. Replacement for this cover runs around $350 so that’s where the curse comes in. Note to self: see if it can be replaced with a metal cover. There is a window in the door so the extra light from the skylight isn’t all that significant. When the plastic cracks, it tends to shatter and blow off, so I’d like to spare the driver behind me from having it blown back at him. Plus I’m pretty sure that would get me a ticket.

Tomorrow I’ll be going over the trailer some more, checking the condition of the windows, vents, latches, etc. I leave tasks like packing the wheel bearings and checking the undercarriage to my trailer maintenance specialist.

Of course, your tow vehicle should also be gone over regularly as well. Some handy things to keep in your tow vehicle include a tool kit, flares or, preferably, weighted reflective triangles, extra fuses, hose repair tape, ties, jumper cables (be sure they are rated for your vehicle), flashlights, and chocolate (just seeing if you’re paying attention).

Things to keep in your trailer: extra halters and lead ropes, buckets, tire repair tools (I have a drive-on ramp instead of a jack for the trailer—if a tire goes flat, drive the good tire on the same side up on the ramp for easy changing https://amzn.to/2SChguq), duct tape, first aid kit (check contents regularly), nitrile gloves, baby wipes, a hose, fire extinguisher…the list goes on and on.

That’s just the list of trailer maintenance tasks. Other considerations that are equally important and topics in their own right:

  • Does your horse load willingly and calmly into the trailer? This is not an issue to tackle during an evacuation! Train your horse to do this before it becomes a non-negotiable. People have lost their horses because they couldn’t get them in the trailer in a pinch, or the horse became injured in a frantic scramble.
  • Can you competently maneuver your trailer? I have to admit I’m not really there. I can get the trailer where I want it, but it’s not a pretty process. There’s one for my “Goals” list.
  • Do you and your animals have “go packs” set up and ready to go? Do you have a plan for packing up feed, water, and other necessities?
  • Do you have a plan for identifying your horse if you become separated in an emergency? Microchipping, marking your horse with a livestock crayon, clipping, tagging, etc. I’ve seen examples of people marking their horses hooves with a marking pen, but that can get worn off or covered with mud so have a backup method.

This information sure doesn’t come under the heading of “fun with your horse”, but it does lead to peace of mind, and that’s worth a lot!