The latest grim joke here in Sonoma County is that our new theme song is “Fire and Rain”—“I’ve seen fire and I’ve seen rain”…
After deadly and devastating wildfires in October 2017, and now massive flooding in February 2019, local residents are getting a bit edgy about natural disasters. The floods have proven far less deadly than the fires. But in both cases, animal owners were faced with getting their animals out—fast. If you own a horse, that means loading up and heading out. But are you ready?
That’s what I asked myself yesterday while watching the news and social media posts crop up. And the answer is—not really. My trailer has been sitting immobile by the barn for probably nearly a year. I haven’t done much riding, and when I do go out, it’s in my riding buddy’s trailer. But if I needed to get my horses out fast, that trailer would need to be ready to go. My buddy’s trailer will be full of her own horses. That’s something to think about if you don’t own a trailer because you know you can borrow one in a pinch. If it’s an evacuation situation, you may not have one available to you.
Thankfully, I didn’t need to evacuate, or help anyone else evacuate, this time. But today I pulled out my trailer checklist and starting doing a maintenance check. Physically going through that checklist surfaced a few “gotchas”. I’m sharing them here as an example of little things that trip you up, and why it’s best to do this check in a non-emergency mode, because often the most routine tasks don’t go quite as you expected.
An obvious first step is to check the tire pressure. I did finally buy a portable air compressor and had checked the tires when I got it a few months ago, but now I couldn’t remember what the PSI should be. It is on the tire sidewall (maximum recommended at cold temps) but the pressure listed on the sidewall is not necessarily the pressure that is correct for the vehicle—my car tires have a much higher PSI listed on the sidewall than the car manufacturer recommends (my old tires didn’t even list PSI—they listed KPa which means Kilopascal, and I had to look up how to convert it—here’s a link https://www.unitconverters.net/pressure/kpa-to-psi.htm). I had done research months ago about what the PSI for my trailer should be, but did I put that information anywhere useful? Like in the tack compartment? Apparently not. Finally I remembered that my trailer service guy had told me to inflate them to 50 PSI (sidewall says 65). So lesson 1—know what your tire pressure should be and post it somewhere useful. Today I printed it out on a label maker and stuck it to the inside of the tack compartment—it won’t fade and the label is waterproof. Also (and maybe it’s just me that has trouble with this), make sure you know how to use the pressure gauge and the compressor’s air nozzle. I always feel like I’m letting more air out than I’m getting in. AND remember to check the spare. That was the only tire that needed to be inflated during today’s check. One thing to look for is missing valve stem caps. It’s a good idea to buy a pack and keep them on hand. This is the one item in the automotive world where one size fits all.
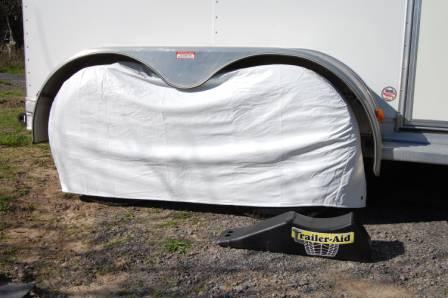
While you’re checking the pressure, give the tires a good looking over. Check for uneven wear, shallow tread depth, and sidewall damage, including sun damage. UV rays can really destroy your tires, causing cracking and breakdown of the rubber. It’s recommended that tires be replaced every 7 years even if the tread is good, mostly because of sun damage. I bought tire covers for mine to protect them from sun damage and hopefully get some extra wear from them.
Check the lug nuts for loose or missing lug nuts. Speaking of which—do you have a lug wrench handy?
On to checking the lights. One of the marker light lenses had blown off. It’s one of the original lenses and wouldn’t stay on when I tried to put it back where it belonged. This isn’t the first time this has happened with this trailer, and finally I bought a 10-pack of both red and amber lenses, so I had one handy. The replacements seem to stay put a lot better than the originals. So think about getting some spares to keep on hand. Even if yours stay on, I’ve had horses damage them if they get a bit squirrely while loading or while tied to the trailer.
Some of my marker lights were out. Interestingly enough, I had checked them last summer and more of them were out then than were out today. Self-healing marker lights, apparently. Three of them were still out. I got one to come back on by removing the lens and tapping the light fixture and jiggling the bulb, and it finally came on and stayed on. The other two seem to be non-operational. My plan is to buy replacement bulbs and see if that does the trick and if not, I’ll have them fixed when the trailer goes in for routine maintenance.
Other things that can go wrong with lights are fuses and wiring. Know where your fuses are and what kind they are and keep some spares on hand. If it’s a wiring problem, well, I leave it to the experts. I can tell a blue wire from a red wire and that’s where my expertise ends.
On to the breakaway brake battery. This is your trailer’s “emergency brake”. A cable gets looped over your hitch and if the trailer comes loose from the tow vehicle, the cable pulls a pin on the trailer that activates a battery operated brake. The batteries tend to go dead if the trailer sits a while (most are hooked into the trailer wiring system and the battery will re-charge when the tow vehicle is running). The battery can be tested with a battery tester. Alternatively, try pulling the pin manually and listen for the click as the trailer brakes go on. You can also pull the pin and then (gently) see if the tow vehicle can move the trailer.
The battery for my system appeared (not surprisingly) to be dead. I was feeling pretty smug because I just got a trickle charger for this purpose. On to the next humbling experience: I had never actually looked at the battery. It’s been either charged up or replaced during the routine maintenance checks but I’ve never looked at it myself. I just assumed it was the same type of battery in my last trailer that could be trickle charged using clamps. But the battery for this trailer has slip on cables and neither of the attachments that came with the trickle charger appear to connect to it. So I still need to figure this one out but the batteries don’t seem to be that expensive so I may just replace it. Or drive around with the trailer empty and see if the battery charges up again–obviously not the best plan
Next step: check the trailer floor. I do this periodically and it’s always been fine, so I was a little surprised to see that the boards were wet under the mats, and in fact had some mud wedged between the mats and the trailer wall. The trailer is aluminum so fortunately there was no rust, and the floor boards don’t seem to have any rot in spite of being wet, but the mats are now pulled up and the floor is airing out. Thankfully the rains have stopped for a couple days so with luck those boards will dry out. Incidentally, if your trailer floor is aluminum, it still needs to be checked. If urine accumulates under the mat, the aluminum can corrode.
Also check the rubber mats on the sides of the trailer and make sure they are secure. I had a horse pull one part way down and rip it, and I know of one person who got to her destination to discover that the side mat had come down sometime during the haul. Fortunately, she had a calm horse who seemed more surprised than concerned, but he did have to straddle it during that trip.
My trailer has an additional “feature” (read: curse) in the form of a crank-up skylight in the tack compartment. Sounds nice, but in fact the plastic cover is definitely not UV resistant and doesn’t seem to last very long. I got it replaced 4 years ago but when I checked it today, sure enough, it has cracks in it, and I have water on my tack compartment floor. Replacement for this cover runs around $350 so that’s where the curse comes in. Note to self: see if it can be replaced with a metal cover. There is a window in the door so the extra light from the skylight isn’t all that significant. When the plastic cracks, it tends to shatter and blow off, so I’d like to spare the driver behind me from having it blown back at him. Plus I’m pretty sure that would get me a ticket.
Tomorrow I’ll be going over the trailer some more, checking the condition of the windows, vents, latches, etc. I leave tasks like packing the wheel bearings and checking the undercarriage to my trailer maintenance specialist.
Of course, your tow vehicle should also be gone over regularly as well. Some handy things to keep in your tow vehicle include a tool kit, flares or, preferably, weighted reflective triangles, extra fuses, hose repair tape, ties, jumper cables (be sure they are rated for your vehicle), flashlights, and chocolate (just seeing if you’re paying attention).
Things to keep in your trailer: extra halters and lead ropes, buckets, tire repair tools (I have a drive-on ramp instead of a jack for the trailer—if a tire goes flat, drive the good tire on the same side up on the ramp for easy changing https://amzn.to/2SChguq), duct tape, first aid kit (check contents regularly), nitrile gloves, baby wipes, a hose, fire extinguisher…the list goes on and on.
That’s just the list of trailer maintenance tasks. Other considerations that are equally important and topics in their own right:
- Does your horse load willingly and calmly into the trailer? This is not an issue to tackle during an evacuation! Train your horse to do this before it becomes a non-negotiable. People have lost their horses because they couldn’t get them in the trailer in a pinch, or the horse became injured in a frantic scramble.
- Can you competently maneuver your trailer? I have to admit I’m not really there. I can get the trailer where I want it, but it’s not a pretty process. There’s one for my “Goals” list.
- Do you and your animals have “go packs” set up and ready to go? Do you have a plan for packing up feed, water, and other necessities?
- Do you have a plan for identifying your horse if you become separated in an emergency? Microchipping, marking your horse with a livestock crayon, clipping, tagging, etc. I’ve seen examples of people marking their horses hooves with a marking pen, but that can get worn off or covered with mud so have a backup method.
This information sure doesn’t come under the heading of “fun with your horse”, but it does lead to peace of mind, and that’s worth a lot!