Author Archives: joanras

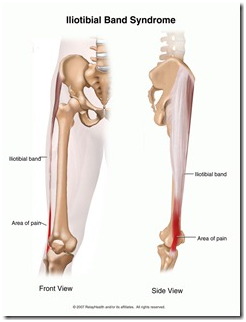
If you’re a rider bothered by occasional to chronic hip and knee pain, read on. You may have ITBS, or Iliotibial Band Syndrome.

ITBS is a common ailment usually identified with running, probably because more people are runners than horseback riders. Skiers, bicycle riders and horseback riders often develop this problem as well. The knee is usually the first part of the body to complain, although in my case the hip is usually the problem area.

The ITB (Iliotibial Band) is a dense fibrous band running from the pelvis to the outside of the knee. It runs over the bony parts of the hip and the outside of the knee, and the rubbing of the band over bone is what causes the problem. The band can become irritated and inflamed, and the underlying bursa can also become swollen.

ITBS

Some causes are leg length asymmetry, over/under pronation, running on hills and hard surfaces, knee instability, and weak muscles. For horseback riders, improper rotation of the leg can contribute. Riders are often told to point their toes forward–properly, you would rotate your entire leg from the hip until the foot is pointing forward, but not by breaking at the ankle to get the forward direction of the toe, or by twisting at the knee. The bend of the knee required for riding can be a setup for ITBS.

I developed ITBS several years ago while training for a marathon. While knee pain is the most common symptom, I developed pretty severe hip pain, probably as a result of being a bit too overweight for the amount of training I was doing, and running on country roads with no shoulder, which means I was on the banked part of the road, which meant my right leg was constantly higher than my left. The best treatment for ITBS is rest, which of course I didn’t do because I was training for a marathon. I ran the marathon and three days later, I got the more common knee pain in a very acute form–heat, swelling, and the feeling that someone had jabbed a knife in my knee. With the race completed, I got the needed rest, and the knee pain thankfully went away, but I’ve had chronic hip pain ever since.

I’ve recently started taking dressage lessons and in many ways am starting all over with my riding. Nobody would call me a natural athlete, so I’d doing a lot of trial and error in my quest to do this correctly. I’d guess I’m riding 80% incorrectly, and my ITBS has flared up with a vengeance, causing quite a bit of pain from my hip all the way down to my ankle. Yes, the ITB goes from your hip to your knee, but since it pulls on your knee when you have ITBS, a muscle called the peroneals now goes into a spasm, and that runs from your knee to your ankle.

What to do? Prevention, as always, is the best course of action, and that means stretching, maintaining fitness, and being conscious of how your are using your body, maintaining correct alignment and avoiding overstress of your leg and knee. Of course, if you’re reading this, it may be safe to assume that it’s too late for prevention. Rest is the next best step–if you develop symptoms, try to identify what you’re doing to cause the problem, and STOP DOING IT! You may need to discontinue riding for a bit to give your leg a chance to heal. And if it’s too late for that, the traditional measures of ice and anti-inflammatories, combined with rest, will help. The best technique I’ve found, though, is a few forms of self-massage involving a tennis ball and a form roller. You can usually find muscle spasms along the band (press on various parts of the outside of your leg from hip to knee, and it shouldn’t take you long to identify the problem areas). The tennis ball is helpful for hip areas–lie on your side with the tennis ball pressing on the spasm and roll over the ball, helping the spasm to break up. The foam roller is useful for spasms on the outside of the thigh. This is going to hurt, so grit your teeth and do what you can! I’ve found, though, that this is the fastest way to get some relief from the pain and tightness.

Keep in mind that I AM NOT A DOCTOR OR ANY KIND OF MEDICAL PROFESSIONAL and you should check with your medical professional before doing any kind of diagnosis or self-treatment.

Runners World has some good information and stretches on their website: http://www.runnersworld.com/tag/itbs-iliotibial-band-syndrome


Leaving Your Horse in Someone Else’s Care

Vacation Beach

So you are planning a vacation without your horse. The first question that comes to mind is, WHY? Why would you do such a thing? Is it really a vacation if you aren’t packing up your rig and Fluffy the horse and heading cross-country to a clinic 1,000 miles away?

OK, I get it. Everyone needs some time away from the “kids”. And of course you have arranged for Fluffy to be fed, watered, and loved on a bit. What could go wrong?

Well…let me share with you the experience a friend had recently. This friend admires horses but has not spent time around them and is not comfortable or familiar with them. Nevertheless, some of her friends decided that she would be the ideal person to take care of their horse while they are away. They’ve made several trips and all went well. Until the last trip, when the horse came down with colic.

Now fortunately, my friend has spent enough time around the neighborhood horses that she did recognize that this was a problem. But guess what? a) She did not know the name of their veterinarian. b) When a veterinarian was tracked down, my friend did not know the age of the horse or any of its medical history. c) If the horse had needed to be transported, there was no way to make that happen. And the final insult, d), the veterinarian was not prepared to extend credit to the owners, and my friend, who has limited means, was forced to come up with payment for the treatment. And on top of all this, she is, of course, not comfortable with handling any horse, much less a sick one.

So there is the answer to “what could possibly go wrong?”. And in this case, the horse responded to treatment, it did not have to be transported, and the veterinarian was paid, so things could have been much worse.

So, when you leave town without Fluffy in tow, here are a few pointers:

-Get a qualified, experienced, reliable person to take care of your horse.

-Leave documents in the horse’s stable area noting the horse’s name, age, medical history, and who to contact in case of emergency. It’s a good idea to have this in the stable area ANYWAY as part of your emergency preparedness plan.

-Notify your veterinarian that you will be out of town and who will be tending your horse and how much authority they have to make decisions on your behalf.

-Make a payment arrangement in advance with your veterinarian–either they agree to extend credit, you leave them a deposit, or leave them with a credit card number.

-Make sure transportation is available for the horse. If you have a rig and the person tending the horse is qualified and comfortable with driving it, have it hooked up, fueled up, and pointing in the right direction. Otherwise, make arrangements in advance with someone who can provide transportation.

-Make sure your horse will load in the trailer!

-Leave your contact information. If you are truly going to be incommunicado, make sure the horse’s caregiver is capable of making tough decisions, or have a backup person available who is.

And once all this is done, NOW you may go on vacation!

Trailering Notes

I’ve had my horse trailer for several years and used it very little. I almost always ride with a neighbor who has a nicer rig and who likes to drive, so my rig is mostly parked. Recently, though, I’ve started taking some lessons and that means I trailer my horse to the lesson place, and the trailer has come out of retirement.

That means the trailer has needed some assessment and attention that, really, should be done on a regular basis whether or not it is being used. You can never tell when you will need it for an emergency, be it a trip to the veterinary hospital or an evacuation, so it should be ready for action at all times.

Some of the basics include pulling up the mats and checking the floors, making sure the lights and brakes are in working order (and the brakes are adjusted properly), checking the emergency brake battery, and of course, checking the tires.

Tires are a particular challenge for me because, honestly, I’ve never been good at using a tire gauge. The minute the thing starts hissing at me, I just want to pull it off the stem. OK, I’m a wuss. But I did manage to ignore the hissing and actually get it seated properly to get an accurate reading, which was way too low. Fortunately, I have one of those portable battery chargers/air compressors and was able to get the tires, (including the spare–don’t forget the spare!) properly inflated. Figuring out proper inflation was a little tricky. This is printed on the sidewall of the tires, and I was looking for a “PSI” number, but my tires happen to have the inflation printed in “KPa” and not “PSI” so it took a while to figure out what number I was looking for. Then I had to go online to figure out the conversion to PSI. By the way, if you divide your “KPa” number by 7, you get the approximate PSI. In my case, it was 60 PSI.

The tires on the trailer are the original tires but have very few miles on them so the tread is great. A bigger concern is the fact that the trailer sits still so much, and sun exposure tends to cause sidewall cracks. There are a few minor cracks and I’ll be looking into replacing the tires soon. I also purchased some tire covers online. These are pretty inexpensive (I think I paid about $35 to cover all the tires) and you can buy covers to cover the tandem wheels on the trailer. Be sure to check the size. I got the “Small” size which fits my 15″ rims. Of course, check the specs on the particular covers you are buying. The covers should protect the tires from sun exposure and extend their life. Remember to take them off before moving the trailer! Yes, that sounds obvious, but still…And if you think that the sidewalls won’t blow out from sitting too much, think again. A neighbor borrowed my little-used pickup and the sidewall blew out on the freeway on a rather high bridge.

In the event of a flat, there is tool that will make your life a lot easier. This is a drive-on tool that elevates the good tire on the same side of the trailer so that the flat can be removed, eliminating the need for a jack. The brand name of the one I bought is Trailer-Aid, which seems to be the industry leader. One tip I learned a long time ago for changing tires is to loosen the lug nuts BEFORE raising the tire off the ground. It can eliminate a lot of tire spinning while you are trying to get those lug nuts loose! Speaking of which, make sure you have a lug nut wrench that fits your wheels, and that you know where it is and how to get to it. Smart idea to practice ahead of time.

If all this seems boring and excessive, let me share a story. While riding at a local recreation area, we encountered an acquaintance whose trailer had gotten sideswiped while leaving the parking lot. It blew out one tire completely (fortunately, that was the worst damage). She limped the rig back to the lot and there she found out how many things can go wrong. She did not have a jack. Her spare tire was flat. She couldn’t get hold of her husband.

Fortunately, my riding companion is “Miss Preparedness” and had the Trailer Aid. We helped the woman find a lug nut wrench that worked with her tires, and then we were able to remove the flat. That’s when we found out the spare was flat. Enter the park ranger, who had the portable compressor in his vehicle. We were able to inflate the spare, which thankfully held air, change the tire, and get the rig rolling again. But it took a team of people with the right equipment. (By the way, if you think the Highway Patrol is going to live up to the “To Protect and To Serve” motto and help out with this operation, you are wrong. They are not allowed to assist. Especially the seemingly 12-year-old officer who showed up for this event).

If all this has put you in the mood for shopping, here’s a pic of the tire cover and of the Trailer Aid, both purchased through Amazon. The tire cover is surprisingly easy to put on and take off.

Trailer cover and TrailerAid

One other item I bought is a cap for the trailer plug. “Stuff” tends to get in the holes in the plug and I’ve know people who blew fuses while plugging in the trailer, usually because some bug has taken up residence inside the plug. Really slows you down, and not so good for the bug either. The cap can keep the plug dry and clean. And make the world a little safer for bugs.

Happy New Year! Make It a Good One!

Happy New Year to everyone!

A new year always seems like a new beginning. We have a fresh start to accomplish those things that we didn’t get done the year before. Problem is, we generally have the same things on those lists (and when I say “we”, I am definitely including “me”!).

“In Balance Equestrian” is intended to be a resource to enable horse owners, and particularly those who keep their horses at home, to lead a “balanced equestrian lifestyle”. Meaning that you are going to have the time and energy to enjoy your horses to the fullest. To be honest, I’ve never achieved that and my evil plan was to figure it out and share the strategy with readers. It seem like there is always something more important to do than spend time with the horses.

Stephen Covey is one of my favorite leadership coaches. His timeless work “The 7 Habits of Highly Effective People” is a great resource, and one of my favorite parts is his method of prioritizing tasks. Tasks are rated by their “Urgency” and their “Importance”.  The idea is to spend your time in the “Important” but “Not Urgent” quadrant to set yourself up for success. It’s pretty easy to define “Urgent”. Those are the things that need to be done NOW. Defining “Important” is a little harder. What’s TRULY important?

I’ve always stated that my horses are very important to me. Yet, when push comes to shove, all activity that doesn’t involve meeting their basic needs (feeding, mucking, etc) has been pushed aside to deal with work and family “emergencies”. Now really, I run a bookkeeping service and I keep stating that there is no such thing as a bookkeeping emergency. Sometimes it’s hard to convince clients of that, though, and I generally cave in to their frantic pleas to get something done right away. Which means abandoning that plan to get in a ride.

Last week the resentment level around that finally hit a peak. I haven’t ridden in over a month and there was still a boatload of work on my desk. My plan has been to schedule in riding time, usually right after lunch. The problem is, once you start in on the work and the phone calls and the e-mails, the momentum builds and taking time out for a ride just doesn’t happen. Realistically, with all the preparation (clothing changes, grooming, tacking up, warmup, ride, untacking and cleaning up, and back into street clothes), a simple ride takes around an hour and a half so that’s a big chunk of time when you are in the middle of something. So I switched things around, and the ride came first. Well, almost first. I did check e-mail and the phone, but didn’t respond to anything, just set up the priorities. That took long enough for the horses to finish their breakfast. And then I got in my ride.

Not only did I get to ride, but it actually made me more productive when I did tackle the workload. I had become so resentful of the time spent at the desk responding to “urgent” requests that I wasn’t really getting much done. The burnout had built to the point that instead of tacking a task right away, I would find a nice diversion in something completely useless (like Candy Crush Saga for instance. I will not share what level I am at). So avoiding doing the things I love and that are important to me had the backlash effect of my wasting more time than ever.

My main point is, while I was stating that my riding is important to me, I wasn’t TREATING it like it was important. If something keeps getting pushed to the back burner, it isn’t something that you have really designated as important.

I’ve been rehabbing an off-track Thoroughbred for two years now, with the intention of making him my next trail horse and maybe tackling some dressage lessons with him. In two years, while we have made some progress, he still doesn’t ride well in a trailer (probably because I have put him in the trailer and taken him for a ride maybe twice), and I have cantered him twice. One of those canters was yesterday after I finally made working with him an actual priority. If I had treated this project as being as important as I said it was, we would probably have hit the trails at least a year ago.

Stephen Covey defines “Important” as contributing to your mission and your goals. So at the start of this new year, let’s look at missions and goals and truly get our priorities straight. If horsemanship is a high priority for you, then treat it that way. It may mean saying “no” to some requests that look important (but who are they important to, and why should someone else’s priority become your priority?). My resolution this year is to set firmer boundaries, train others (and me!) to treat my time with respect, and get a lot more clear on what is really important to me.

When I was a kid, I always wanted to be the youngest person to accomplish something. Didn’t matter what it was, I just wanted that record. Of course, it didn’t happen, and now my best bet is to try to be the oldest person to accomplish something. My chances of that are a lot better at this point, but I sure wish I had accomplished some of those things years ago!

Mat Management

Rubber stall mats make a great surface for stall floors. They’re cushy for your horse and easy to clean. And even our local gophers, which don’t seem to be stopped by anything, haven’t been able to chew through them.

There are some issues with them, though. The first one you’ll likely encounter is that they are hard to move. The standard size is 4’x6′ and they are 3/4″ thick solid rubber and weigh in at around 100 lbs. They are not only heavy but awkward and hard to hold on to.

I discovered a great tool called a Mat Grabber. There are a few companies that make these and they all seem to be plastic. They have a toothed upper and lower surface. Slide them on the mat and when you pull back, they grab the mat. They have handles so you can just pull back on the mat to move it, and there is a handy release button. Many ranch supply stores stock them, or you can order them online (I got mine through Amazon).

A few tips on using these things. Pull STRAIGHT back to lock them in place. Also, clean up the mats as much as possible as dirt and moisture will cause them to slip. Keep the grabber surfaces clean as they will slip if dirt or mud build up between the teeth. You can use a screwdriver to clean them out between the teeth. These things take a little getting used to but when you get the hang of them, they are worth their weight in gold!

The next issue is that the mat may not fit exactly in your stall. They are sized so that six of them will surface a 12×12 surface, but if your structure has footings, as my new barn does, and you want the mats to fit inside the footings, you may need to trim them. NOTE–trimming is a good idea, as if the mat sides slide up over the footings, you can trap moisture and worse in between the wall and the mat–not good for the wall surface.

I had hoped that there was a slick power tool for this but it seems not. The toothed surfaces of circular saw blades apparently make a mess and generate a lot of heat when used on rubber. I read about a special jigsaw blade for the purpose but was not able to actually locate one. The generally accepted practice is to use a heavy-duty utility knife (a fixed blade as opposed to retractable is recommended). Measure carefully (you don’t want make these cuts more than once) and mark the line. I snapped a chalk line. Lay the mat over a board with the cutting line resting on the edge of the board. This way, the trimmed portion will fall away as you cut it, making it easy to see the cutting line and reducing friction on the blade.

Using a straight edge (such as a board) get a good first cut so you can easily see the cut mark and then try the best tip I found online. Spray the cut with WD40. This will really make the cutting process much easier. With that tip, and keeping a sharp blade in the cutter, It took me about 3 or 4 passes with the knife to get through the mat. Not bad for a thick piece of heavy rubber. The WD40 will pretty much erase your chalk line, so be sure to get a good first cut and use the board so you can see where you made the cut. Otherwise you are likely to get a lot of random cut marks, making for a sloppy cut line and a lot of extra work!


Fencing Tip

I am tearing down old fencing to make way for the new barn and new, reconfigured paddocks. So this is a good time to share some fencing education that I learned a bit late and for which I am now paying the price. My fencing is typical 5-foot horse fencing. When I put it up several years ago, I chose to put the staples into the fenceposts directly over the spot where the horizontal and vertical wires met and were wired together. Seemed stronger that way.

Then I took the Facilities Management class at Santa Rosa Junior College and learned that the correct way to staple the fencing is to put the staples over the horizontal wires. That way, if a horse hits the fence, there is some “give” that can save both the horse and the fence from damage.

And now that I am “undoing” my incorrect installation, I can share another reason for not putting the staples in over the junction of horizontal and vertical wires. IT IS A PAIN TO REMOVE THOSE STAPLES WHEN APPLIED IN THIS MANNER! I’m using my trusty fencing tool to remove the staples, and trying to pry the end under that mish-mosh of joined wires to pry the staple loose is time-consuming and difficult.

So staple the fencing correctly, and save your horse, your fence and yourself some damage and aggravation!

By the way, I bought my fencing tool in the 1970s when I was riding in the Working Cowgirl class in local parades, and it was a required piece of equipment. That’s the only reason I bought it. Forty years later, it is one of my most valuable pieces of equipment! Also known as fencing pliers. I’d hoped to include a picture but I don’t seem to be able to find one that is not copyrighted and I’m too lazy to go out and take a picture of my own.

Your Horse Needs a Passport

PassportThe last few months have served as a reminder that we should all be prepared for a disaster. Fires, earthquakes, flooding, hurricanes have enormous potential to create emergency situations for people, pets and livestock.  Horses present a unique set of problems due to their size. One of those problems is that, in case evacuation is necessary, the potential for separation from their owners is great.

One step you can take to help re-unite you with your horse in the unspeakable event of separation is to create a passport for your horse–in fact, a passport system. This would consist of an identification sheet for your horse, and smaller versions that can be attached to your horse in an emergency if there is potential for separation.

The contents of the information sheet should be detailed and include photos of your horse with yourself (to establish ownership). Photos should include details of any identifying marks such as brands, tattoos, scars, etc.

Seriously consider microchipping your horse and registering the microchip. There are a variety of registries. See the previous post in this blog for more details. The microchip number should be included on the information sheet and also on the passport.

Other information on the ID sheet should include the horse’s name (registered and stable name), registration number, your name, address and phone number, medical information. Coggins information including a the certificate should be placed in a plastic ziploc bag with the ID sheet (DO NOT keep the Coggins certificate with the horse in case of separation–it can be used to claim ownership).

Some of the information on the ID sheet should be on a smaller tag that can be attached to the horse if separation seems possible. This tag should include a photo, the horse’s name, your name and contact information, and medication information. This can be inserted into a luggage tag and braided into the horse’s mane or tail. It’s a good idea to practice this technique in advance so you’re sure it is secure!

Other ways to mark your horse for identification in an emergency include using a livestock-marking crayon to write your information on your horse’s coat, using clippers to shave your phone number onto the horse, marking hooves with permanent color marker (“my horse has blue hooves”), leg bands, neck collars such as those used in broodmare operations, and halter tags. If you put a halter on your horse in an emergency, leather works best as it will break if the horse gets caught in something.

The ID sheet and tags should be laminated to protect them in a chaotic emergency situation. Store them where you know you can get to them easily in an emergency! Review them periodically to see if the data needs to be updated–put a review date on your calendar every few months.

Nobody wants to think about being separated from their animals and you may think you would simply never leave them, but it’s impossible to anticipate what may happen in an emergency. Knowing you have a plan in case of separation is a part of your emergency plan designed to give you some peace of mind.

Do You Weigh your Hay?

A few years ago, I would have told you that weighing your hay was the act of an obsessive-compulsive nut. Years later, having gone through several horses with wildly varying nutritional needs and tendencies toward being over- or underweight, I gave in and started weighing the hay, and the rest of their feed as well.

It does add time to the daily routine, but there are rewards. The horses get a consistent meal every time–and if you were 100% dependent on someone providing your food, wouldn’t you want to make sure you got your fair share? If their weight changes due to activity level increases or decreases or changes in the weather, I know exactly how much I am changing their ration and can track the effect. It’s also good information to have available for your veterinarian if you run into medical problems.

I use their hay bags to weigh the hay. I know how much each horse’s bag weighs (Cowboy’s weighs 2 lbs, Dublin’s weighs 1.5 lbs–keep in mind that all hay bags are not created equal), I figure out how much hay they should get, come up with a total, and that’s how much the stuffed hay bag should weigh. If you use the same container for the same horse every time, you can just weigh the total instead of weighing the container separately each time or zeroing out the scale once the container is on it. To weigh their pellets or grain, I use a supplement bucket that comes with a tight-fitting lid. If they each use the same kind of bucket, you just need to know the weight of one. The lid lets me weigh their ration out a feeding ahead of time, and store it without worrying about rodent invasions, dirt, or moisture.

The scale I use is a hanging scale that is suspended from the barn rafter. I use a plant hanger hook to get it to a comfortable height. Platform scales can also work but I find the hanging scale easier to work with when weighing bulky items such as hay. Mine is a mechanical hanging scale (dial-type), if you are going to Google it, and it is made by Pelouze which seems to be a leader in decent-quality reasonably priced industrial-type scales. Besides the dial face, there are also sliding faces like you see on fish-weighing scales or digital scales (batteries or power required). Figure out how much weight you need to weigh and buy a scale with the appropriate capacity. Too small and you’ll be weighing more than once, too large and you’ll be paying more and it will be harder to get an accurate reading since the increments will be smaller. I think mine weighs up to 50 lbs and that’s plenty of capacity. My horses like to eat but they don’t need anything like 50 lbs! A smaller one would have been fine but this is a pretty standard size and is still very readable, so it was the most economical choice for my needs.

As I mentioned above, I weigh everything out one feeding ahead of time. There are a few reasons for this. First, I am not an early riser and the horses are more than ready for breakfast when I get out to feed in the morning. With everything ready to go, I can give them their hay immediately and keep them happy while their pellets are soaking (while the pellets soak, I measure out the next feeding). If I can’t get home in time to feed in the afternoon or evening, I can call the neighbors and they can feed for me with a minimum of fuss (helpful hint: maintain good relations with your neighbors, you never know when this will happen!)

So that’s the scoop (hah!) on hay weighing around here.

Microchip Day!

Today the horses got microchipped, part of our emergency preparedness plan. This is a good idea for all your companion animals and involves implanting a readable device under the skin which can be scanned for identification purposes in the event of separation during a disaster, or theft.

Once chipped, you will get a bar code label with the chip number on it–you will probably get several copies. One should go in the horse’s permanent file, one can be used to make a horse “passport” for the barn or to take traveling, and another can be put in your emergency evacuation kit.

There are various organizations which will register the chip number. Unfortunately, there is no “one” central database. Building a local database would be a good suggestion for your county’s emergency services unit!

The largest independent registration for equine microchips appears to be the Equine Protection Registry through Microchip ID Equine. You can register your horse’s microchip at this site for a fee of $19.50.  I can also register that microchip with the same registry that has my cat’s info, so if you already have a microchipped pet, check with that registry. It’s convenient to have all that info in the same place! The cat’s registry is Petlink. There is a fee of $19.99, which seems to be standard.

The microchips give us a bit more peace of mind about our horses’ safety. The only horse who did not get a chip is my Thoroughbred, Dublin, who has a legible lip tattoo through the Jockey Club. If your horse has a tattoo, you may not need a microchip–but be sure that the tattoo is legible and your horse will allow someone to look at it! And that you are the registered owner of the horse.